Showing posts with label Maya. Show all posts

Wednesday, April 29, 2015

The Difference Between Bump and Normal Maps

 In cases where it would be inefficient to use geometry to capture minor details like the gaps between bricks or floorboards, another kind of texture map can be used which, for many years, was known as a bump map.


 This image shows three spheres. The first sphere has flat and has no texture assigned to it. The second sphere has a simple checker map assigned to the bump channel. The bump map tells the renderer how to light the model, without affecting the geometry. For many years, the bump map was used to create this extra detail, but often it seemed rather flat and unrealistic, especially if it was used heavily in a model. In succession, normal maps were created, which, by defining a lot more than a bump map, tells a lot more information to the renderer which helps it light the model in a more realistic manner. This is what is applied to the right-most sphere and, comparing the two method it is clear which is the most superior.


These are the textures that were assigned. Bump maps worked in greyscale, where how light or dark an area defined how 'displaced' an area was on the model. Normal maps work a lot differently. By simulating light hitting an object from three different directions, it is a lot more detailed, but also harder to replicate by hand.

 This is a visualisation of a normal map. This model is simply a cube with a torus laid on top. There are multiple lights that are rendered. First, there is a white ambient light. Then, in three directions, lights for the three primary colours are placed. Often blue faces straight down, with red and green being the other two. Finally, lights with the same colour but negative intensity are placed opposite of the directional lights.

However, this is often not how normal maps are generated. There are multiple ways that they can be made.

First of all is the most simple - converting a bump map into a normal map. This is not a perfect method but for most cases it works fine. Programs such as Crazybump and xNormal are able to do this.

The second method is creating both a high-poly and low-poly model and projecting the detail of the high-poly onto a normal map using the low-poly model's UV unwrap. You can do this with xNormal or even directly in the sculpting program zBrush, with a few tweaks.


Despite the versatility of normal maps, they must be used in moderation. When creating them, one must consider how much the detail will stand out and whether it is possible to get away with faking it without people notice. Sometimes it is flat-out better to use geometry as these maps do not change the geometry and all illusion is lost once you see it from an angle that isn't intended.

Saturday, April 25, 2015

Understanding Different Texture Maps


In order to create life-like models, multiple different types of textures must be considered. Here, I'll be talking about three different maps which can control how an engine renders your model.


As shown above, there are five spheres, all with different basic textures assigned to it. The first 'basic' sphere has no texture assigned to it, and has just a simple 'blinn' material attached. Blinn is a better choice than the program's default lambert because you have a lot more choice with assigning different texture maps.

The second sphere, the diffuse sphere, is a sphere with just a diffuse texture assigned to it. The diffuse defines the colours of the model and is probably the most important for basic models.

The third sphere has only a specular texture assigned. The specular controls the intensity and colour of the lighting that is placed upon a model. This is best used to create materials convincingly, such as metals. It is also very useful for models with different materials within it, where you can define how shiny different parts of a model are. For example, with a sword, the metal sword blade will be a lot shinier than the hilt, which means the specular texture will be brighter.

The fourth sphere has a gloss texture assigned. The gloss defines how rough part of a model is. This texture is only greyscale as colour in this texture does not make any difference to the rendering of the model. The roughness is defined as how large the specular highlight - the shiny area - is.

The last sphere shows how the specular and gloss work together. As the gloss is larger here, the specular highlight is very large in areas where the specular texture is also white. Using and experimenting with these methods can create a wide range of materials.


In Autodesk Maya, these three textures are under various names. The Diffuse is fairly self explanatory, located under 'Common Material Attributes'. By clicking the checkered square on the side of the diffuse slider you can select the choice to choose a file to load. 

The other two textures are located under 'Specular Shading'. The Specular map can be accessed by using 'Specular Color', whilst the Gloss map can be accessed by using 'Eccentricity'. 


Friday, April 10, 2015

Learning to Think in Primitives

 It is well known that most modelling programs have an array of similar objects that you can start modelling with, going by the name of primitives. These primitives encompass the basic 3D shapes - the cube, cylinder, cone, sphere, plane and torus - as well as some unique ones like the teapot. Unlike in the real world, models are not required to have physics so you can mash them together almost however you like, but one useful skill for creating models from life is summarising shapes with primitives. This skill can save a whole lot of time and trouble when creating a model from life, as it gives you more chance to position things correctly without having to go in and modify single vertices, sides or faces.


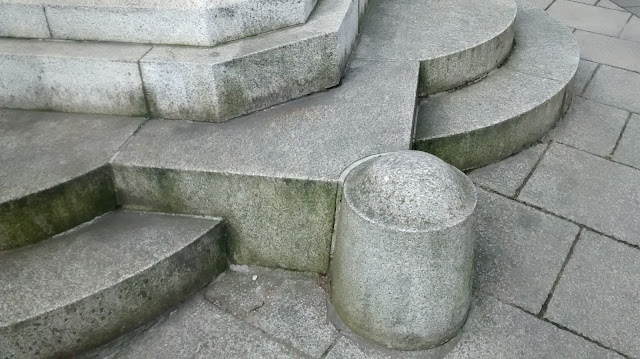
Take this corner of a monument, for example. At first glance it looks very complex, but it can be summarised into different kinds of primitives, with only minor tweaks to a few of them.

This is a visual representation of what the shape could be, using just three different types of primitives. Red shapes are cubes, green being cylinders whilst blue are spheres. At this point in time, there is no need to worry about combining these and, as stated before, it doesn't matter that they clip into each other as physics does not apply in this situation.


This is the final result. In order to get some of the other shapes such as the flattened part on the top-most cube, I used the bevel tool. I scaled down some of the cylinders for the stairs to get a more accurate shape, but you can still see, in essence, the shape of each primitive put together to form a cohesive object. Learning this skill is invaluable to create accurate and well-built models quickly and efficiently, and practicing by drawing over images you have can help.